Click here to read the full article on Serious Eats.
For one whole month, we’re tackling duck, starting with whole bird butchery and resulting in a host of delicious recipes, including a feast of roasted dry-aged breasts and decadent confit legs. So far, this Big Duck Project has been all basics, like how to render duck fat and how to make insanely rich duck stock. It’s not the most thrilling stuff, but every Duck* worth a damn knows that you can’t start with the Flying V or knuckle-puck, you gotta start slow, learning how to stop on the ice by crashing into walls of empty soda cans.
* If you’re not a D2 fan, don’t even talk to me. I saw that movie while visiting the States as a kid and was so into Team USA Ducks that I made my parents get me a set of Rollerblades and a street hockey stick only to return to our cobblestoned neighborhood in Rome, where the closest paved empty parking lot for falling on my ass was a good half-hour drive away. So yeah, I was pretty cool.
Today, we’re finally diving into the cool stuff: dry-aging duck crowns, which we’ll eventually oven-roast and sauce with a silky duck jus. Dry-aging duck may sound intimidating, but all it really entails is sticking a couple uncovered birds in your fridge for roughly two weeks.
If you’re not sure how to get your hands on duck crowns, here’s our guide to breaking down whole ducks. If you want to skip the rest of this duck project and just do the dry-aging, whole ducks can be used for this project as well, assuming you can find the fridge space. Quack! Quack! Quack!
Dry-aging meat of any kind is a serious commitment of time, space, and money. Most of us choose to leave this work to professional butchers or chefs, who rightfully pass on production costs to consumers by charging a premium. While dry-aged beef has become increasingly popular and therefore easier to find in the States, dry-aged duck isn’t something that you can purchase retail, even at boutique specialty butcher shops; the only places you come across it are on high-end restaurant menus. Your best option is to make it yourself.
One of the goals of dry-aging duck is to dry out the skin to help it crisp (one of the elements that makes dry-brining such an appealing option for poultry in general). But as the duck skin dries, there’s also plenty going on below the surface: Dry-aging meat promotes the enzymatic breakdown of muscle proteins into shorter fragments, resulting in improved flavor as well as texture.
All told, I like to think of dry-aging as an amplification of all the traits that make duck great—dry-aged birds have even crispier skin, more deeply flavored meat, and a more tender texture than their already-delicious fresh-cooked counterparts. Fortunately for duck lovers around the world, it’s a pretty simple process.
The best way to dry-age birds is to hang them by the neck, so that air can circulate around them on all sides. This isn’t really possible with a hulking 12-pound prime rib, which is best aged on a wire rack, but it’s far more feasible to pull off with duck crowns that weigh in at around two pounds each. Hanging allows the skin to dry out evenly, which is important for consistent results.
Convinced? Here’s what you need to know to get started.
Because this project takes a substantial amount of time, space, and attention, I recommend purchasing at least two whole ducks to make the effort worthwhile.
Specifically, I recommend seeking out air-chilled ducks, which can be found at butcher shops, some supermarkets with well-stocked butcher departments, or online from specialty poultry purveyors like D’Artagnan and LaBelle Farms.
Why air-chilled ducks? Well, most ducks and chickens are rapidly chilled after slaughter by plunging them in an ice-water bath, which adds up to 10% of extra water weight. Extra weight means more money for the purveyor, but all that water dilutes the duck’s flavor and makes the skin much more difficult to crisp. Air-chilled birds, on the other hand, don’t retain extra water weight, and seeing as the name of the game here is DRY-aging, why would we want to start with a WET bird?
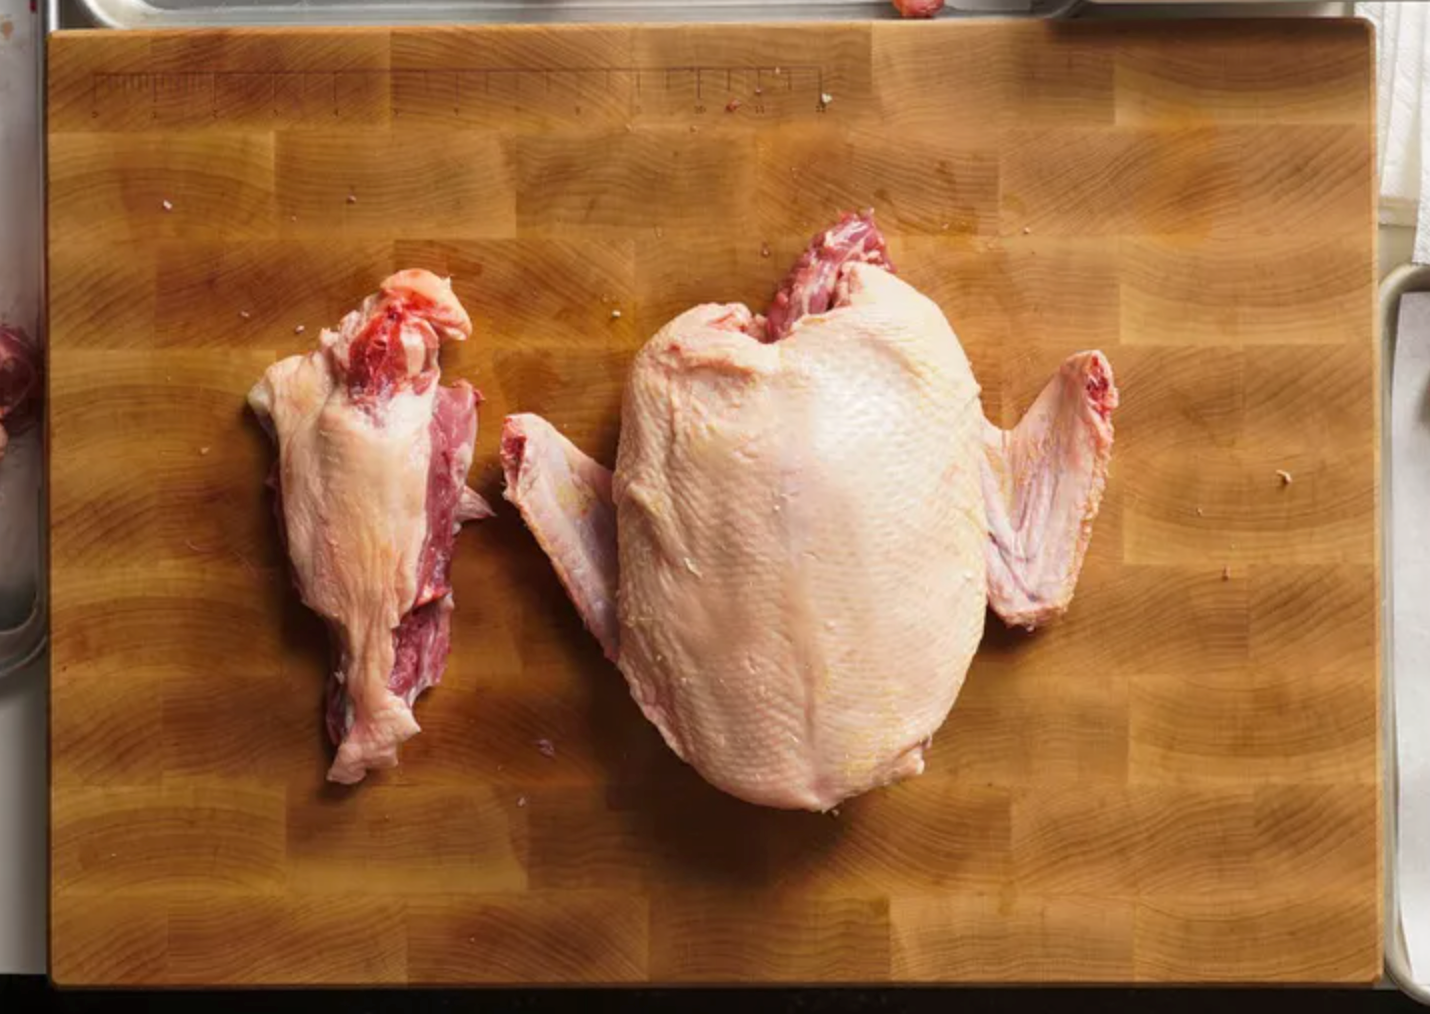
If you’re keeping stride with my Big Duck Project, the next step is to break down the whole ducks for different cooking applications. The part that we’re dry-aging is the “crown” of the duck, which comprises the two breasts and wings, all attached to the rib cage and upper back. Carving the duck this way and leaving it on the bone allows us to keep the breast meat protected from drying out (as well as from possible spoilage) by minimizing its exposure to open air—the meat itself is entirely shielded by skin on the front side and the membranous rib cage on the backside.
If you don’t want to take on the work of butchering ducks and, as we’ll cover in an upcoming post, turning the legs into confit, you can also dry-age the ducks whole. Just keep in mind that doing so will take up more vertical fridge space, since you need to keep the ducks elevated throughout the aging process and ducks with legs are longer than ducks without (there’s a joke in there somewhere).
Of course, you could also be one of those lucky souls who has a garage with a second fridge that’s filled with frosty beverages (I’ve seen these on TV shows and imagine that they exist somewhere in the real world, right?) that can be cleared out for a couple of weeks without anyone getting upset.
If you really don’t have the room to hang duck crowns in the fridge, you can age the crowns on a wire rack in the same way that Kenji dry-ages beef. The reduced air circulation around the area where the crown is in contact with the wire rack means that it won’t dry as evenly as a crown that’s hung, but as long as you age the duck with the breast side facing up and exposed to air, you’ll still achieve good results (the breast meat and skin covering it are the real prizes here).
Assuming you’ve decided to go the hanging route, you’ll need something to attach the ducks to. Those of you who have fridges with metal-grate shelves are all set, but if your fridge is outfitted with solid glass or plastic shelves, like the ones in the Serious Eats test kitchens, you’ll need to rig up a rod that can support the weight of the ducks.
After some brainstorming and internet research, I settled on these adjustable heavy-duty tension rods that can bear up to 20 pounds. They worked like a charm—easy to install and strong enough to support three duck cages simultaneously. With two tension rods, I was able to dry-age six ducks in the same fridge at once.
I also recommend buying a couple of heavy-duty S-hooks to hang over the rod, rather than tying the ducks directly onto the rod. The latter is an option, but it’s a lot more awkward—there’s a good chance you’ll wind up swinging a bunch of ducks around on a stick like a deranged puppeteer as you struggle to secure the tension rod against the walls of your fridge. S-hooks also allow you to easily move the ducks around throughout the aging process without having to disassemble the whole rig, plus they can be used for hanging pots and pans or kitchen towels when you’re done with this project.
Unsurprisingly, you’ll need some heavy-duty kitchen twine to tie around the ducks’ necks on one end and knot around the S-hook at the other. If you’re like me and never were in the Scouts or went to sailing camp, there’s a YouTube deep dive on knot-tying in your future.

Finally, a few sheets of parchment paper or a rimmed baking sheet are all you need to catch drippings from the birds during their first three days of hanging.
So you have the equipment, the ducks have been broken down into parts, fat is rendering, and stock is simmering on the stovetop, and space has been cleared in the fridge. It’s time to string up the birds.
First things first, give your cleared-out fridge shelves a good wipe-down to ensure that the ducks dry-age in a clean and sanitary space. “Given the chance, bacteria will feast on meat surfaces and multiply,” writes Harold McGee in On Food and Cooking. We don’t want that to happen.
So before you hang up the birds, get rid of that moldy container of leftovers in the back of the fridge. Secure the tension rod at a height that will allow you to hang the ducks so that they aren’t touching the shelf below them. Then lay your sheet of parchment or baking sheet on that bottom shelf.

With clean or gloved hands, dry each duck crown as best you can by wiping the skin and cavity with paper towels.
Working one duck at a time, cut a piece of twine—around eight inches should do—and tie a butcher’s knot around the small stub of neck at one end; then tie another knot around an S-hook at the other. Be sure to record the date you’re starting, either on a piece of tape attached to the twine or noting it in a notebook or on your phone.
Hang the ducks on the tension rod, making sure that they’re not touching the bottom shelf or one another.
During the first few days of aging, the cavity and rib cage area will drip. Moisture loss is a part of the dry-aging process, and it’s nothing to worry about; just change out the parchment every couple of days until the dripping stops.
Other than that, you’ll want to monitor for any signs of spoilage, like off odors or visible mold. As long as you work clean, you shouldn’t have any problems, but if you do, you can rest assured that they’ll present themselves in a very obvious way—there’s no mistaking the smell of rotting meat. I dry-aged a lot of ducks in my restaurant-cooking days, as well as a small flock for this Big Duck Project, and I’ve never had any problems with spoilage when dry-aging ducks on the cage. That said, if you do, cut your losses and start over. It’s not worth making yourself or others ill by trying to salvage things.
The enzymatic activity that occurs during dry-aging improves the flavor and texture of the meat. On the flavor side, enzymes break down large flavorless compounds into smaller, flavorful fragments; proteins are turned into amino acids, glycogen into glucose, and fats into aromatic fatty acids. These are all good things for flavor. At the same time, enzymes are working away to tenderize the meat, breaking down proteins and weakening collagen in connective tissue.
People who aren’t fans of duck often complain that they find the meat to be chewy, which is totally valid. Duck breast is certainly chewier than chicken breast, especially when it’s undercooked (I strongly believe that duck breast is best cooked to at least medium for this reason). However, dry-aged duck breast is so much more tender than unaged duck breast, even when cooked to the same exact temperature.
The dry-aging process tenderizes the meat while also firming up the flesh and skin as the bird loses moisture. Check out the difference in the texture of raw duck breast on day one and day 14 when pressed with a finger. The breast and skin start out super-soft and supple; lightly poking it with my finger left a huge dimple in the breast. But over the course of two weeks of dry-aging, the skin tightens and the flesh firms up while also becoming more tender (the proof of which will be seen later when the crowns are roasted).
There are noticeable changes in texture and appearance after just a few days of dry-aging, when you compare the photo above of the freshly butchered duck and the one below on day three.
The skin is taught and harder to pinch between your fingers. It’s also beginning to change color, particularly around the wings.
When flipped over, you can see how the cavity and rib cage areas have dried and turned a darker shade of red—both are good signs. Note that no breast meat is actually exposed to the air.
While you will see progress after just three days, in my opinion, the sweet spot for the best flavor and texture for dry-aged duck is between 10 and 14 days. By that time, moisture loss will have run its course, the skin will have had time to dry out beautifully, and enzymes will have done their work producing deep, rich flavor and tender meat. Below, you can see the difference between day three and day 14 on the rib cage side of two ducks.
With dry-aged duck, we’re not looking for those ultra-funky blue cheese notes that are found on 60-day dry-aged beef. Just intense, ever-so-slightly sweet duck breast. Two weeks is plenty of time to get that result. That’s how long Daniel Humm ages birds for his signature roast duck course at Eleven Madison Park. However, if you’re dead set on going longer, you can; chef Rich Torrisi likes to push the dry-aging all the way to 30 days for the duck at Dirty French.
With two sets of three ducks to age, I decided to give the first three birds different skin-care routines during aging. I let all three birds hang unadulterated for the first three days of dry-aging in order to dry out the skin. On the fourth day, I left one naked, and the other two I gave paint jobs: one received a Peking-style brush-down of soy sauce and maltose syrup, and the other one I coated with blended shio koji.
For the rest of the dry-aging period, I applied new coats of flavored paint every other day, allowing the skin to dry in between each coat. For both of the lacquered duck crowns, I made sure to apply a thin and even coat each time. This is another case for hanging the ducks, as it allows any excess to drip off the crowns onto the parchment below.
As for which one turned out best, you’ll have to wait until we get to the roasting portion of the Big Duck Project (spoiler alert: shio koji duck rules).